Customizing your character in Baldur’s Gate 3 is an exciting prospect, but did you know that you can also customize your armor? In addition to finding the perfect items from merchants, you have the option to purchase dye and apply it to your armor. The possibilities are endless when it comes to creating a personalized look.
Step-by-Step Guide: How to Dye Your Armor & Clothes
The first step in dyeing your armor is to find a merchant who sells the desired dye. One of the Tieflings found at Emerald Grove is a great option, but keep an eye out for other merchants as well.
Once you have acquired the dye, the process is straightforward:
- Open your inventory and locate the purchased dye.
- Click on the dye to open a menu with various actions.
- Select the “Combine (Character)” option to begin the dyeing process.
With just a few clicks, you’ll have beautifully dyed armor and clothes that reflect your personal taste and style. Explore the wide range of colors available and create a unique visual identity for your character.

By doing so, a new window will appear, allowing you to easily apply it to a piece of armor or clothing.

Master the Art of Screen Capture with Mac’s Screenshot Shortcuts
Are you tired of fumbling around with complex screen capture tools? Look no further than your trusty Mac computer, which offers an array of built-in screenshot capabilities. With just a few simple keyboard shortcuts, you can effortlessly capture high-quality screenshots and unleash your creativity.
One of the most versatile features of Mac’s screenshot functionality is the ability to capture the entire screen, a specific window, or even just a selected portion. This flexibility allows you to personalize your screenshots to suit your specific needs.
So, what are these magical shortcuts that will revolutionize your screenshot game? The secret lies in the powerful combination of the Shift, Command, and number keys. These keys unlock a world of possibilities, enabling you to capture your screen with precision and efficiency.
For example, by pressing Shift + Command + 3, you can instantly capture the entire screen. This is ideal for capturing stunning landscapes or sharing a snapshot of your entire desktop setup.
Need to focus on a specific window? No problem! With the Shift + Command + 4 shortcut, your cursor transforms into a precise crosshair. Simply click and drag to capture a perfectly framed screenshot of any window.
But wait, there’s more! Mac’s screenshot shortcuts also allow you to capture a specific portion of your screen. By pressing Shift + Command + 4, followed by pressing the spacebar, your cursor turns into a camera icon. Move the camera over the desired area, and with a single click, that section is yours to capture.
Once you’ve taken your screenshot, the possibilities for customization and sharing are endless. Whether it’s cropping, annotating, or even adding text or drawings, Mac provides a range of editing tools to help you perfect your masterpiece.
Now that you’re armed with these valuable screenshot shortcuts, you can capture and share your screen with confidence. No more wasting time with complicated third-party apps or struggling to find the right buttons. Mac’s built-in screenshot capabilities put the power in your hands, so get ready to unleash your creativity and share your world with the click of a button.

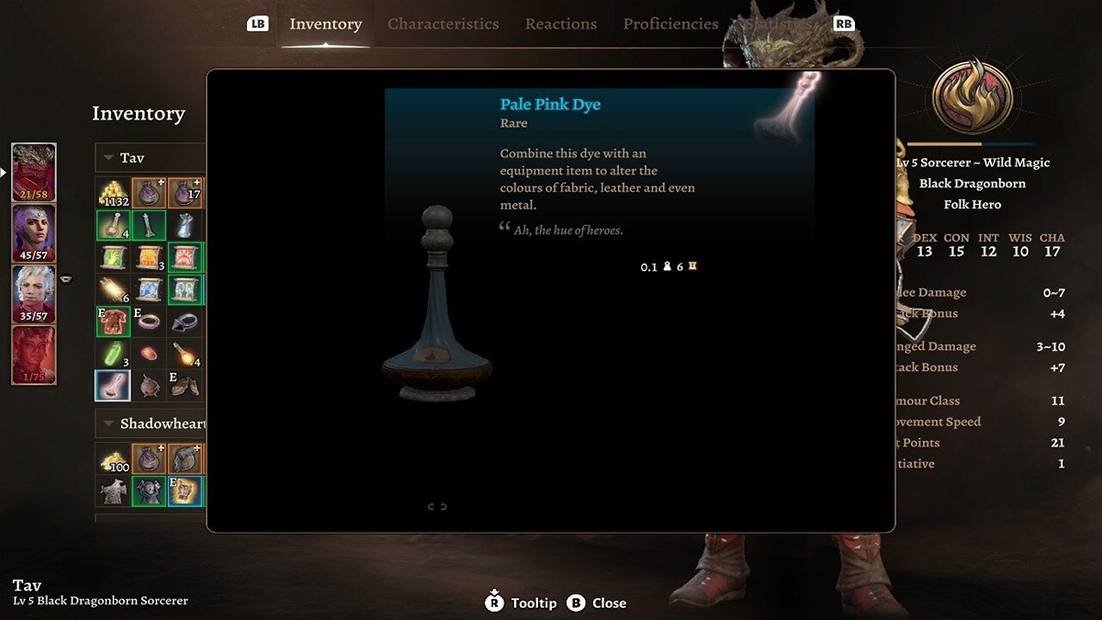
Using the dye of your choice, you can easily apply a beautiful color to your project. Although it will consume some of the dye, the results are worth it. Just take a look at the stunning transformation when we used the Pale Pink Dye.

Discover the Power of Mac Screenshot Shortcuts
Are you ready to take your screenshot game to the next level? Look no further than the incredible capabilities of Mac screenshot shortcuts. With just a few simple key combinations, you can capture, modify, and share stunning screenshots on your Mac computer.
Whether you need to capture the entire screen, a specific window, or just a portion of your display, Mac screenshot shortcuts have got you covered. And the best part? These shortcuts are incredibly easy to use and remember.
Let’s dive into the world of Mac screenshot shortcuts and explore the possibilities:
1. Capture the Entire Screen
Want to capture everything you see on your Mac screen? Simply press the Shift + Command + 3 keys simultaneously, and voila! Your entire screen will be captured as a high-quality image.
2. Capture a Specific Window
Need to focus on a specific window or application? No problem! Just press Shift + Command + 4, and your cursor will turn into a crosshair. Click and drag the crosshair to select the window you want to capture. Release the mouse button, and boom! You now have a perfect screenshot of the selected window.
3. Capture a Customizable Area
Got a specific section of your screen that you want to capture? Mac screenshot shortcuts have you covered. Press Shift + Command + 4 on your keyboard, and your cursor will once again turn into a crosshair. Click and drag to select the area you want to capture. As you drag, you’ll see the dimensions of the selected area. Release the mouse button, and ta-da! You now have a custom-sized screenshot.
But wait, there’s more! With Mac screenshot shortcuts, the possibilities are endless. You can also modify your screenshots by adding annotations, resizing, and cropping, all with just a few clicks.
So, whether you’re a designer showcasing your latest project, a teacher creating instructional materials, or just want to capture a funny meme, Mac screenshot shortcuts are your ultimate companion.
What are you waiting for? Grab your Mac, unleash the power of shortcut keys, and start capturing stunning screenshots in no time!
If you’re playing Baldur’s Gate 3 and you’re not satisfied with a particular dye, it’s wise to save your game before using it, as the game unfortunately lacks a preview feature for dyes. However, there is a glimmer of hope as you can find a helpful item called the Dye Remover within the game.
When it comes to dyes in Baldur’s Gate 3, there is an extensive selection of colors for you to choose from. To make it easier for you, we have compiled a comprehensive list below:
- Baby Blue and Gold
- Black and Azure
- Black and Furnace Red
- Black and Jade Green
- Black and Summer Green
- Bloody Plum
- Blue
- Boreal Blue
- Brown Alabaster
- Cobalt
- Custard and Pink Rose
- Dark Amethyst
- Deep Lilac
- Drake General
- Faewild Green and Dun
- Gorgeous Maroon
- Green
- Harlequin Black and White
- Indigo
- Jet and Pink Rose
- Lavender
- Light Blue
- Lime, Lemon, and Lichen
- Lush Burgundy
- Mellow Fruit
- Muddy Red
- Ocean
- Orange
- Pale Green
- Pale Orange
- Pale Pink
- Peach and Apricot
- Pink and Leaf Green
- Purple
- Red
- Sage Green
- Sea Green
- Sinful Red on Bone White
- Swamp Green
- White and Scarlet
- Yellow
Rest assured that the above list covers all the possible dye colors you can find in the game. If you come across a merchant, it’s worth noting that their selection may reset after a long rest, offering you an excellent opportunity to discover more dyes. And if you’re looking for additional Baldur’s Gate 3 guides on finding better equipment for dyeing, be sure to check out our helpful links below.
About the author
Cameron Waldrop
Cameron Waldrop is a dedicated freelance writer for Twinfinite. He specializes in covering popular battle royale games like Fortnite and Apex Legends. Joining the Twinfinite team in late 2019, Cameron has provided numerous insightful game reviews. Although he has a soft spot for shooter games, his true passion lies in Japanese role-playing games (JRPGs).
Leave a Reply
You must be logged in to post a comment.